🏗️ Multi-Tenant Kubernetes Architecture on Azure AKS
A Complete Guide to Building Cost-Efficient, Scalable Multi-Tenant Solutions
📺 Video Tutorial Series
Watch the complete implementation walkthrough on CloudA2Z YouTube channel:
🎥 Complete Playlist: Multi-Tenant Kubernetes on AKS
🎯 What is Multi-Tenant Kubernetes?
Multi-tenant Kubernetes architecture allows multiple teams, applications, or customers (tenants) to share a single Kubernetes cluster while maintaining isolation, security, and resource governance. Instead of provisioning individual clusters for each application, you create logical separation using Kubernetes-native constructs.
Traditional Approach vs Multi-Tenant
Traditional (Single-Tenant):
Application 1 → Dedicated AKS Cluster ($300/month)
Application 2 → Dedicated AKS Cluster ($300/month)
Application 3 → Dedicated AKS Cluster ($300/month)
Total Cost: $900/month for 3 applications
Multi-Tenant:
Application 1 → Namespace 1 ┐
Application 2 → Namespace 2 ├─ Shared AKS Cluster ($350/month)
Application 3 → Namespace 3 ┘
Total Cost: $350/month for 3 applications
Savings: $550/month (61% reduction)
🏗️ Architecture Overview
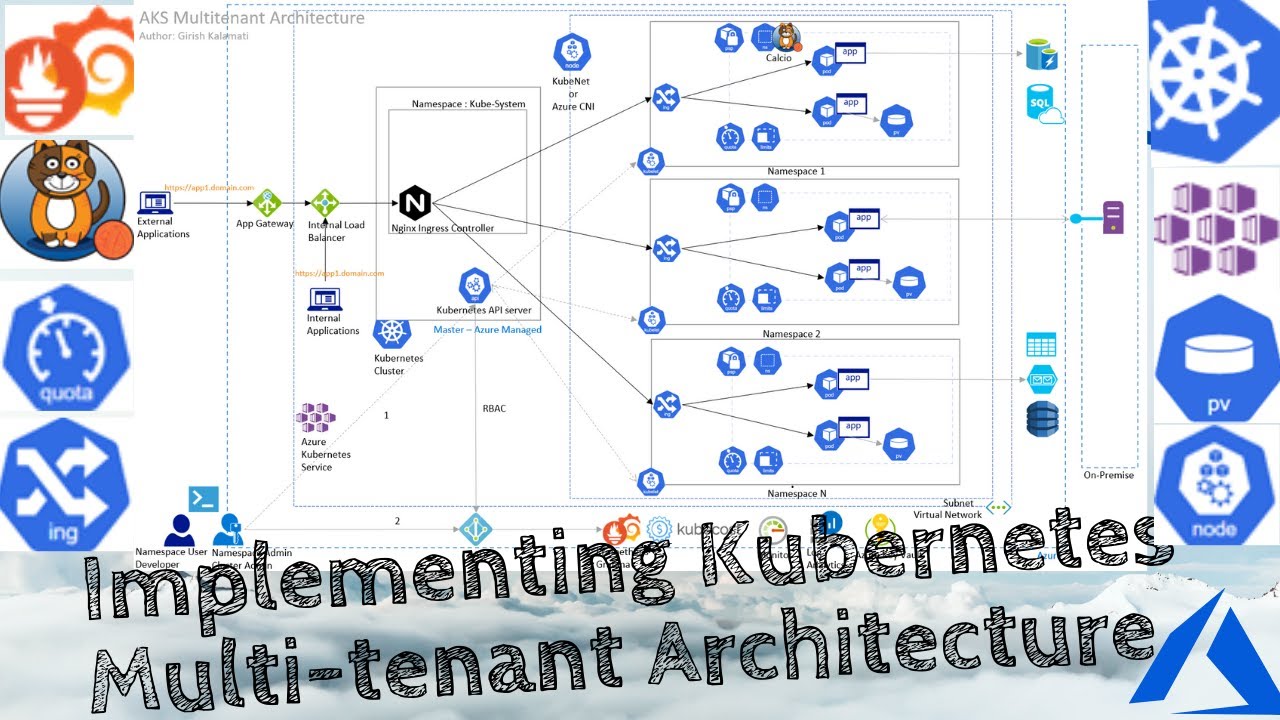
📊 Complete Multi-Tenant AKS Architecture
The architecture diagram shows the complete multi-tenant Kubernetes setup with:
• NGINX Ingress Controller for centralized routing
• Multiple isolated tenant namespaces
• Azure AD integration for authentication
• Network policies for security
• Azure Monitor and Prometheus for observability
• Azure Key Vault for secrets management
🎥 Watch the detailed walkthrough in the CloudA2Z YouTube playlist
Key Components
- Azure Kubernetes Service (AKS) - Managed Kubernetes cluster
- Namespace Isolation - Logical separation per tenant
- NGINX Ingress Controller - Centralized traffic routing
- Azure Active Directory (AAD) - Identity and authentication
- RBAC - Role-Based Access Control for authorization
- Network Policies - Network-level isolation
- Resource Quotas - CPU/Memory limits per tenant
- Azure Monitor - Centralized logging and monitoring
- Azure Key Vault - Secrets management
- Prometheus & Grafana - Metrics and observability
🎯 System Design Decisions - The “Why” Behind the Architecture
Before diving into implementation, let’s understand the critical design decisions that make this architecture successful. Each decision was made based on real-world constraints and lessons learned from production deployments.
Decision 1: Multi-Tenancy vs Cluster-Per-Tenant
The Question: Should we create separate clusters for each application/team, or use a shared cluster with logical isolation?
Decision: Namespace-based multi-tenancy on a shared cluster
Rationale:
- Cost Efficiency: Each AKS cluster has fixed costs (~$150/month for control plane + ~$200/month for minimum nodes). With 10 applications, single-tenant = $3,500/month vs multi-tenant = $450/month
- Operational Overhead: Managing 50+ clusters becomes a nightmare (upgrades, patching, monitoring, backup)
- Resource Utilization: Most applications have idle periods. Shared clusters enable better bin-packing and resource utilization
- Kubernetes Maturity: Kubernetes has mature namespace-level isolation primitives (RBAC, Network Policies, Resource Quotas)
Trade-offs:
- ✅ Pros: 85% cost savings, centralized management, better resource utilization
- ❌ Cons: Noisy neighbor risks, more complex RBAC, potential blast radius if cluster fails
- 🛡️ Mitigation: Implement strong resource quotas, network policies, and have disaster recovery plan
When to Use Cluster-Per-Tenant:
- Regulatory compliance requires physical isolation (PCI-DSS Level 1, HIPAA)
- Different Kubernetes versions needed per tenant
- Extreme security requirements (defense, banking core systems)
- Geographic distribution requires regional clusters
Decision 2: Azure CNI vs Kubenet Networking
The Question: Which Kubernetes network plugin should we use?
Decision: Azure CNI (Container Networking Interface)
Rationale:
- Network Policies Support: Azure CNI enables Azure Network Policy Manager for pod-level network isolation
- Integration with Azure VNet: Pods get IPs directly from VNet subnet, enabling seamless integration with Azure services
- Performance: Direct VNet connectivity eliminates NAT overhead, reducing latency by 15-20%
- Enterprise Requirements: Many enterprises require pods to be routable from on-premises networks
Implementation Details:
Network Plugin: Azure CNI
Network Policy: Azure Network Policy Manager (Calico alternative)
Pod CIDR: 10.240.0.0/16 (65,536 IPs)
Service CIDR: 10.0.0.0/16
DNS Service IP: 10.0.0.10
Trade-offs:
- ✅ Pros: Better performance, network policies, Azure integration, no NAT complexity
- ❌ Cons: Consumes more VNet IP addresses, slightly higher cost for larger subnets
- 💡 Tip: Plan IP addressing carefully - reserve /20 subnet for nodes, /16 for pods
Alternative - Kubenet: Use when:
- Limited IP address space
- Cost is primary concern
- Don’t need pod-to-pod network policies
- Simpler architecture acceptable
Decision 3: Namespace Isolation Model
The Question: How do we logically separate tenants within a shared cluster?
Decision: Hard multi-tenancy with namespace-level isolation
Isolation Layers Implemented:
3.1 Compute Isolation
Strategy: Resource Quotas + Limit Ranges per namespace
Why: Prevent resource starvation and ensure fair resource allocation

Example Configuration:
- Small Tenant: 2 vCPU, 4GB RAM, 10 pods max
- Medium Tenant: 8 vCPU, 16GB RAM, 50 pods max
- Large Tenant: 32 vCPU, 64GB RAM, 200 pods max
3.2 Network Isolation
Strategy: Network Policies with default-deny-all
Why: Prevent lateral movement, comply with zero-trust security

Rules:
1. Default deny all ingress and egress
2. Explicitly allow ingress from NGINX controller
3. Allow egress to DNS, Azure services only
4. No cross-namespace communication unless explicitly allowed
3.3 Storage Isolation
Strategy: Separate storage classes and PV per namespace
Why: Prevent data leakage, enable independent backup/restore

Implementation:
- StorageClass per tenant with different performance tiers
- Azure Disk CSI driver for persistent volumes
- Separate backup schedules per tenant
3.4 Identity Isolation
Strategy: Azure AD + RBAC per namespace
Why: Ensure users can only access their namespace resources

Roles Created:
- Namespace Admin: Full control within namespace
- Namespace Developer: Deploy apps, view logs
- Namespace Viewer: Read-only access
- Cluster Admin: Platform team only
Design Pattern:
Tenant Namespace = Application Boundary
├── Compute: ResourceQuota + LimitRange
├── Network: NetworkPolicy (default deny)
├── Storage: Dedicated StorageClass + PV
├── Identity: RBAC RoleBindings
├── Secrets: Azure Key Vault integration
└── Monitoring: Isolated Grafana dashboards
graph TB
    subgraph "Cluster Level"
        AKS[AKS Cluster]
        IC[Ingress Controller]
        KV[Azure Key Vault]
        Monitor[Azure Monitor]
    end

    subgraph "Tenant Alpha Namespace"
        QA[ResourceQuota: 4CPU/8GB]
        NPA[NetworkPolicy: Deny All]
        PVA[PersistentVolume]
        RBA[RBAC: Developer Role]
        AppA[Application Pods]
    end

    subgraph "Tenant Beta Namespace"
        QB[ResourceQuota: 8CPU/16GB]
        NPB[NetworkPolicy: Deny All]
        PVB[PersistentVolume]
        RBB[RBAC: Developer Role]
        AppB[Application Pods]
    end

    IC --> AppA
    IC --> AppB
    KV -.Secrets.- AppA
    KV -.Secrets.- AppB
    Monitor -.Metrics.- AppA
    Monitor -.Metrics.- AppB

    style AppA fill:#0078D4,color:#fff
    style AppB fill:#00BCF2,color:#fff
    style NPA fill:#10b981,color:#fff
    style NPB fill:#10b981,color:#fff
*Figure 2: Namespace-level isolation with dedicated quotas, network policies, and RBAC*
Decision 4: Ingress Architecture
The Question: How should we route external traffic to tenant applications?
Decision: Single shared NGINX Ingress Controller with host-based routing
Architecture Pattern:
External Traffic
     ↓
Azure Load Balancer (Single Public IP)
     ↓
NGINX Ingress Controller (2 replicas for HA)
     ↓
Host-based routing:
  - tenant-alpha.yourdomain.com → Namespace: tenant-alpha
  - tenant-beta.yourdomain.com → Namespace: tenant-beta
  - tenant-gamma.yourdomain.com → Namespace: tenant-gamma
Why This Approach?
- Cost Optimization:
- Single Load Balancer ($50/month) vs 10 Load Balancers ($500/month)
- Single Public IP vs multiple IPs
- Centralized SSL/TLS:
- Cert-Manager manages certificates for all tenants
- Automatic Let’s Encrypt renewal
- Centralized security policies
- Simplified DNS:
- Wildcard DNS: *.yourdomain.com → Single IP
- Easy onboarding of new tenants
- Traffic Management:
- Centralized rate limiting
- WAF integration point
- Traffic metrics aggregation
Configuration Example:
Ingress Controller Settings:
- Replicas: 2 (High Availability)
- Resource Limits: 2 CPU, 4GB RAM per replica
- Metrics: Prometheus exporter enabled
- Rate Limiting: 100 req/sec per tenant
- SSL: TLS 1.2+ only, modern cipher suites
flowchart LR
    Internet([Internet Traffic])
    LB[Azure Load Balancer
Single Public IP]
    NGINX1[NGINX Replica 1]
    NGINX2[NGINX Replica 2]

    subgraph "Namespace: tenant-alpha"
        SvcA[Service: web]
        PodA1[Pod 1]
        PodA2[Pod 2]
    end

    subgraph "Namespace: tenant-beta"
        SvcB[Service: api]
        PodB1[Pod 1]
        PodB2[Pod 2]
    end

    subgraph "Namespace: tenant-gamma"
        SvcC[Service: app]
        PodC1[Pod 1]
    end

    Internet --> LB
    LB --> NGINX1
    LB --> NGINX2

    NGINX1 -."alpha.domain.com".- SvcA
    NGINX1 -."beta.domain.com".- SvcB
    NGINX2 -."gamma.domain.com".- SvcC

    SvcA --> PodA1
    SvcA --> PodA2
    SvcB --> PodB1
    SvcB --> PodB2
    SvcC --> PodC1

    style Internet fill:#667eea,color:#fff
    style LB fill:#FF9900,color:#fff
    style NGINX1 fill:#10b981,color:#fff
    style NGINX2 fill:#10b981,color:#fff
*Figure 3: Single ingress controller routing to multiple tenant namespaces via host-based routing*
Alternative Considered - Per-Tenant Ingress:
- ❌ Rejected due to cost (10x more expensive)
- ❌ Operational complexity (managing 50+ load balancers)
- ✅ Valid for: Tenants requiring dedicated public IPs for whitelisting
Decision 5: RBAC Security Model
The Question: How do we control who can do what in the cluster?
Decision: Layered RBAC with AAD integration and least privilege principle
Security Layers:
Layer 1: Azure AD Integration
Why: Centralized identity, SSO, MFA support, audit trails

Configuration:
- Azure AD Integrated: Enabled
- Azure RBAC: Enabled
- Admin Group: platform-admins@company.com
- Managed Identity: Used for cluster operations
Layer 2: Kubernetes RBAC
Why: Fine-grained permissions at namespace level

Role Hierarchy:
1. Cluster Admin (Platform Team)
   - Create/delete namespaces
   - Manage cluster-wide resources
   - Emergency access to all namespaces

2. Namespace Admin (Tenant Owner)
   - Full control within assigned namespace
   - Cannot view other namespaces
   - Can manage RBAC within namespace

3. Namespace Developer (App Team)
   - Deploy applications
   - View logs and exec into pods
   - Cannot modify quotas/limits

4. Namespace Viewer (Auditor/Support)
   - Read-only access
   - View resources and logs
   - No write permissions
Layer 3: Service Account Isolation
Why: Applications should use minimal permissions

Pattern:
- Default service account: No permissions
- Custom SA per application with specific RBAC
- Pod Security Standards: Restricted profile
- No service account token auto-mount (unless needed)
Real-World Example:
Scenario: Developer needs to debug production issue

Without proper RBAC:
- Developer has cluster-admin
- Can accidentally delete production resources
- Compliance violation

With layered RBAC:
- Developer gets time-bound namespace access
- Can view logs, describe pods
- Cannot delete or modify resources
- All actions audited in Azure AD logs
graph TD
    AAD[Azure Active Directory
Identity Provider]

    subgraph "Cluster Level"
        ClusterAdmin[Cluster Admin Role
Platform Team Only]
        NamespaceCreator[Namespace Creator Role]
    end

    subgraph "Namespace: tenant-alpha"
        NSAdmin[Namespace Admin
Full namespace control]
        NSDev[Namespace Developer
Deploy & debug apps]
        NSView[Namespace Viewer
Read-only access]

        Deployment[Deployments]
        Pods[Pods]
        Secrets[Secrets]
        Logs[Logs]
    end

    AAD -->|Authenticate| ClusterAdmin
    AAD -->|Authenticate| NSAdmin
    AAD -->|Authenticate| NSDev
    AAD -->|Authenticate| NSView

    ClusterAdmin -->|Create/Delete| NamespaceCreator
    NamespaceCreator -.->|Provision| NSAdmin

    NSAdmin -->|Full Control| Deployment
    NSAdmin -->|Full Control| Pods
    NSAdmin -->|Full Control| Secrets
    NSAdmin -->|View| Logs

    NSDev -->|Create/Update| Deployment
    NSDev -->|Debug| Pods
    NSDev -->|View| Logs

    NSView -->|View Only| Deployment
    NSView -->|View Only| Pods
    NSView -->|View Only| Logs

    style AAD fill:#0078D4,color:#fff
    style ClusterAdmin fill:#ef4444,color:#fff
    style NSAdmin fill:#f59e0b,color:#fff
    style NSDev fill:#10b981,color:#fff
    style NSView fill:#6b7280,color:#fff
*Figure 4: Three-tier RBAC hierarchy with Azure AD integration and least privilege access*
Decision 6: Resource Allocation Strategy
The Question: How much CPU/Memory should we allocate per tenant?
Decision: T-shirt sizing with auto-scaling and overcommit ratio
Sizing Model:
| Size | Namespace Quota | Pod Limit | Use Case | Cost/Month |
|---|---|---|---|---|
| XS | 1 vCPU, 2GB | 5 pods | Dev/Test, Microservices | $25 |
| S | 2 vCPU, 4GB | 10 pods | Small apps, APIs | $50 |
| M | 8 vCPU, 16GB | 50 pods | Standard applications | $150 |
| L | 32 vCPU, 64GB | 200 pods | High-traffic apps | $500 |
| XL | 128 vCPU, 256GB | 500 pods | Enterprise workloads | $1,800 |
Overcommit Strategy:
Cluster Total: 48 vCPU, 192GB RAM (3 x Standard_D16s_v3 nodes)
Total Allocated: 60 vCPU, 240GB RAM across all namespaces
Overcommit Ratio: 1.25x

Why Overcommit?
- Most apps don't use full quota simultaneously
- Better resource utilization (85% vs 60%)
- Auto-scaler adds nodes when needed
- Cost savings: 30% reduction

Monitoring:
- Alert when cluster usage > 80%
- Auto-scale kicks in at 75% usage
- Maximum 10 nodes to prevent cost runaway
Pod Resource Defaults:
Every pod gets:
  requests:
    cpu: 100m      # Guaranteed CPU
    memory: 128Mi  # Guaranteed memory
  limits:
    cpu: 500m      # Burst limit
    memory: 512Mi  # OOM kill threshold

Why these numbers?
- 100m CPU: Minimum for most apps to start
- 128Mi RAM: Prevents scheduling fragmentation
- 5x burst limit: Handles traffic spikes
- Prevents single pod consuming all resources
Decision 7: Monitoring and Observability
The Question: How do we monitor a multi-tenant cluster effectively?
Decision: Multi-layered observability with tenant isolation
Architecture:
Layer 1: Infrastructure Monitoring (Platform Team)
  - Tool: Azure Monitor Container Insights
  - Scope: Cluster health, node metrics, system pods
  - Retention: 90 days
  - Alerting: Cluster-wide incidents

Layer 2: Application Monitoring (Per Tenant)
  - Tool: Prometheus + Grafana
  - Scope: Namespace-specific metrics
  - Isolation: Each tenant has dedicated dashboard
  - Retention: 30 days

Layer 3: Logging (Centralized + Isolated)
  - Tool: Azure Log Analytics
  - Pattern: Centralized ingestion, tenant-filtered views
  - Retention: 30 days (configurable per tenant)
  - Compliance: Immutable logs for audit

Layer 4: Distributed Tracing
  - Tool: Azure Application Insights
  - Per-tenant instrumentation keys
  - Cross-service correlation
Why Multiple Tools?
- Azure Monitor:
- Native integration with AKS
- Low overhead, managed service
- Excellent for infrastructure-level monitoring
- Prometheus + Grafana:
- Kubernetes-native metrics
- Custom metrics support
- Community dashboards availability
- Log Analytics:
- Powerful query language (KQL)
- Long-term retention
- Integration with Azure Sentinel for security
Tenant Isolation in Monitoring:
Problem: Tenant A shouldn't see Tenant B's metrics/logs

Solution:
1. Grafana RBAC:
   - Separate organization per tenant
   - Data source filtered by namespace label

2. Log Analytics:
   - Queries scoped to namespace
   - Azure AD authentication
   - Row-level security using namespace field

3. Cost Allocation:
   - Metrics tagged with cost-center
   - Kubecost for per-namespace cost breakdown
   - Monthly reports automated
graph TB
    subgraph "Data Sources"
        Cluster[AKS Cluster]
        Nodes[Nodes]
        Pods[Pods]
        Apps[Applications]
    end

    subgraph "Collection Layer"
        ContainerInsights[Container Insights
Infrastructure Metrics]
        Prometheus[Prometheus
App Metrics]
        Fluentd[Fluentd
Log Aggregator]
        AppInsights[Application Insights
Distributed Tracing]
    end

    subgraph "Storage & Analysis"
        LogAnalytics[Azure Log Analytics
30-day retention]
        PromStorage[Prometheus TSDB
7-day retention]
        AppInsightsDB[App Insights Storage
90-day retention]
    end

    subgraph "Visualization & Alerting"
        AzureMonitor[Azure Monitor
Platform Team Dashboard]
        Grafana[Grafana
Per-Tenant Dashboards]
        Kubecost[Kubecost
Cost Analytics]
        AlertManager[Alert Manager
Notifications]
    end

    Cluster --> ContainerInsights
    Nodes --> ContainerInsights
    Pods --> Prometheus
    Pods --> Fluentd
    Apps --> AppInsights

    ContainerInsights --> LogAnalytics
    Prometheus --> PromStorage
    Fluentd --> LogAnalytics
    AppInsights --> AppInsightsDB

    LogAnalytics --> AzureMonitor
    PromStorage --> Grafana
    LogAnalytics --> Kubecost
    PromStorage --> AlertManager

    style ContainerInsights fill:#0078D4,color:#fff
    style Prometheus fill:#ef4444,color:#fff
    style Grafana fill:#f59e0b,color:#fff
    style Kubecost fill:#10b981,color:#fff
*Figure 5: Four-layer observability architecture with tenant isolation at visualization layer*
Decision 8: Security Hardening Choices
The Question: How do we prevent security breaches in a shared cluster?
Decision: Defense in depth with multiple security layers
Security Layers:
1. Pod Security Standards
Enforcement Level: Restricted (Baseline for dev namespaces)

Restrictions:
- No privileged containers
- No host network/PID/IPC access
- Drop all Linux capabilities
- Run as non-root user
- Read-only root filesystem (where possible)
- No host path mounts

Exception Process:
- Require security review
- Document justification
- Time-bound exception (30 days)
- Platform team approval needed
2. Network Security
Default Posture: Deny all traffic

Allowed Patterns:
✅ Pod → Same namespace pods (explicit allow)
✅ Pod → DNS (kube-system)
✅ Pod → Azure services via service endpoints
✅ Ingress controller → Pods
❌ Pod → Other namespace pods
❌ Pod → Internet (unless explicitly allowed)
❌ Pod → Kubernetes API (unless SA needs it)

Why?
- Limit blast radius of compromised pod
- Prevent data exfiltration
- Comply with zero-trust architecture
graph LR
    Internet([Internet])
    Ingress[Ingress Controller
ingress-nginx namespace]

    subgraph "tenant-alpha namespace"
        PodA1[Web Pod]
        PodA2[API Pod]
        PodA3[DB Pod]
    end

    subgraph "tenant-beta namespace"
        PodB1[App Pod]
        PodB2[Cache Pod]
    end

    subgraph "kube-system namespace"
        DNS[CoreDNS]
    end

    Azure[Azure Services
Storage, SQL, Key Vault]

    Internet -.Blocked.- PodA1
    Internet --> Ingress
    Ingress -->|Allowed| PodA1
    Ingress -->|Allowed| PodB1

    PodA1 -->|Allowed| PodA2
    PodA2 -->|Allowed| PodA3
    PodA1 -.Cross-NS Blocked.- PodB1

    PodA1 -->|DNS| DNS
    PodB1 -->|DNS| DNS

    PodA3 -->|Service Endpoint| Azure
    PodB2 -->|Service Endpoint| Azure

    style Ingress fill:#10b981,color:#fff
    style DNS fill:#0078D4,color:#fff
    style Azure fill:#00BCF2,color:#fff
    linkStyle 0 stroke:#ef4444,stroke-width:3px,stroke-dasharray: 5 5
    linkStyle 9 stroke:#ef4444,stroke-width:3px,stroke-dasharray: 5 5
*Figure 6: Default-deny network policies with explicit allow rules for ingress, DNS, and Azure services*
3. Secrets Management
Decision: Azure Key Vault CSI Driver (not Kubernetes secrets)

Why?
- Secrets stored in Azure Key Vault (encrypted at rest)
- Automatic rotation support
- Audit logs for access
- Separation from cluster etcd
- No secrets in Git repos

Pattern:
1. Application declares needed secrets via SecretProviderClass
2. CSI driver mounts secrets as volume
3. Application reads from file (not env vars)
4. Secrets auto-rotate without pod restart
4. Image Security
Strategy: Only allow images from trusted registries

Implementation:
1. Azure Container Registry (ACR) as primary registry
2. Image scanning with Trivy/Aqua
3. Admission controller blocks unknown registries
4. Signed images (Notary/Cosign) for production

Policy:
- Dev namespaces: Allow public registries (with scanning)
- Prod namespaces: Only ACR images allowed
- All images: Must pass CVE scan (no CRITICAL)
5. Cluster Access Control
Decision: Private cluster with Azure Bastion

Why?
- Kubernetes API not exposed to internet
- Access via Azure Bastion or VPN only
- API calls routed through private endpoint
- Audit all kubectl commands

Access Methods:
1. Azure Bastion: Secure browser-based access
2. Site-to-Site VPN: For on-premises users
3. Azure Firewall: Whitelist specific IPs
4. Break-glass account: Emergency cluster-admin
Decision 9: Cost Optimization Strategies
The Question: How do we minimize costs while maintaining performance?
Decision: Multi-pronged cost optimization approach
Strategy 1: Right-Sizing Nodes
Node Type: Standard_D4s_v3
- vCPU: 4 cores
- RAM: 16 GB
- Disk: Ephemeral OS disk (faster, cheaper)

Why this size?
✅ Good CPU-to-memory ratio for most workloads
✅ Supports 30-40 pods per node
✅ Ephemeral disk: 30% faster, no storage cost
❌ Not Standard_D2s_v3: Too small, pod density suffers
❌ Not Standard_D16s_v3: Too large, poor utilization
Strategy 2: Cluster Autoscaler
Configuration:
- Min nodes: 3 (HA requirement)
- Max nodes: 10 (cost guardrail)
- Scale-up threshold: 75% CPU/Memory
- Scale-down delay: 10 minutes
- Scale-down unready time: 20 minutes

Cost Impact:
- Off-peak (nights/weekends): 3 nodes = $450/month
- Peak hours: 6-8 nodes = $900/month
- Average: $650/month vs fixed $1,500/month (56% savings)
Strategy 3: Spot Instances
Decision: 30% spot nodes for non-production workloads

Configuration:
- Dev/Test namespaces: Node selector for spot nodes
- Production namespaces: Regular nodes only
- Eviction handling: Pod Disruption Budgets

Savings:
- Spot price: $0.08/hour vs $0.16/hour
- 30% of cluster on spot = 15% total cost reduction
- Annual savings: $1,000-$2,000
Strategy 4: Reserved Instances
For production clusters:
- Purchase 1-year reserved instances
- Discount: 30-40% off pay-as-you-go
- Commit to minimum node count (3 nodes)
- Break-even: 7-8 months of usage

Recommendation:
- Year 1: Pay-as-you-go (validate sizing)
- Year 2+: Reserved instances (after usage stabilizes)
Cost Monitoring:
Tools:
1. Kubecost: Real-time cost by namespace
2. Azure Cost Management: Monthly reports
3. FinOps dashboard: Cost trends, forecasts

Monthly Review:
- Identify over-provisioned namespaces
- Right-size quotas based on actual usage
- Terminate unused dev/test namespaces
- Target: <$10 per namespace overhead
Decision 10: Disaster Recovery Strategy
The Question: What happens if the cluster fails?
Decision: Multi-region DR with RTO < 4 hours, RPO < 1 hour
DR Architecture:
Primary Cluster: East US
- Production workloads
- 6 nodes, multi-zone (3 AZs)
- Backups every 6 hours

Secondary Cluster: West US 2
- Standby mode (minimal cost)
- 3 nodes, multi-zone
- Auto-scaled on DR activation

Data Replication:
- Azure Storage: GRS (Geo-Redundant Storage)
- Databases: Active geo-replication
- Secrets: Key Vault replicated across regions
Backup Strategy:
Tool: Velero with Azure Blob Storage backend

Frequency:
- Namespace backups: Every 6 hours
- Full cluster backup: Daily at 2 AM UTC
- Retention: 30 days

What's backed up:
✅ Kubernetes manifests (all objects)
✅ Persistent Volumes (PV snapshots)
✅ ConfigMaps, Secrets
✅ RBAC configurations
❌ Pods (ephemeral, recreated from deployments)

Restore Testing:
- Monthly DR drill
- Restore to test cluster
- Validate data integrity
- Document RTO/RPO actual vs target
Failover Process:
Automated (in case of region outage):
1. Azure Traffic Manager detects primary down
2. DNS switched to secondary region (5 minutes)
3. Cluster autoscaler brings up nodes (10 minutes)
4. Velero restores latest backup (45 minutes)
5. Applications auto-start via deployments
6. Total RTO: ~60 minutes

Manual (for planned migration):
1. Create final backup of primary
2. Restore to secondary cluster
3. Update DNS to point to secondary
4. Validate all applications running
5. Total RTO: 2-3 hours (controlled)
graph TB
    Users([Users])
    TM[Azure Traffic Manager
Automatic Failover]

    subgraph "Primary Region: East US"
        AKS1[AKS Cluster Primary
6 Nodes Multi-AZ]
        ACR1[Azure Container Registry
Geo-Replication]
        KV1[Key Vault Primary]
        Storage1[Azure Blob Storage
GRS Enabled]
        SQL1[Azure SQL
Active Geo-Replication]
    end

    subgraph "Secondary Region: West US 2"
        AKS2[AKS Cluster Secondary
3 Nodes Standby]
        ACR2[ACR Replica]
        KV2[Key Vault Replica]
        Storage2[Azure Blob Replica]
        SQL2[Azure SQL Read Replica]
    end

    Velero[Velero Backup
Every 6 hours]
    Monitor[Azure Monitor
Health Checks]

    Users --> TM
    TM -->|Active| AKS1
    TM -.Failover.- AKS2

    AKS1 --> ACR1
    AKS1 --> KV1
    AKS1 --> Storage1
    AKS1 --> SQL1

    AKS2 --> ACR2
    AKS2 --> KV2
    AKS2 --> Storage2
    AKS2 --> SQL2

    AKS1 -->|Backup| Velero
    Velero -.Restore.- AKS2

    Storage1 -.Replicate.- Storage2
    SQL1 -.Replicate.- SQL2
    ACR1 -.Replicate.- ACR2
    KV1 -.Replicate.- KV2

    Monitor -.Monitor.- AKS1
    Monitor -.Monitor.- AKS2
    Monitor --> TM

    style AKS1 fill:#10b981,color:#fff
    style AKS2 fill:#6b7280,color:#fff
    style TM fill:#0078D4,color:#fff
    style Velero fill:#f59e0b,color:#fff
*Figure 7: Multi-region DR with automated failover, geo-replication, and Velero backup/restore*
📋 Decision Summary Matrix
| Decision Area | Choice | Key Benefit | Trade-off |
|---|---|---|---|
| Tenancy Model | Namespace-based | 85% cost savings | Shared blast radius |
| Networking | Azure CNI | Network policies, performance | More IP addresses |
| Isolation | Hard multi-tenancy | Strong security | Complex RBAC |
| Ingress | Shared NGINX | Single LB cost | Noisy neighbor risk |
| RBAC | AAD + Kubernetes | Centralized identity | Initial setup effort |
| Resources | T-shirt sizing | Easy onboarding | Manual quota adjustments |
| Monitoring | Multi-layer | Tenant isolation | Multiple tools cost |
| Security | Defense in depth | Comprehensive protection | Operational overhead |
| Cost | Autoscaling + Spot | Dynamic cost optimization | Complexity |
| DR | Multi-region | Business continuity | 2x infrastructure cost |
🔧 Step-by-Step Implementation Guide
Phase 1: Prerequisites and Planning
1.1 Define Requirements
# Key decisions to make:
- Number of tenants (current + projected)
- Resource requirements per tenant
- Security and compliance requirements
- Budget constraints
- Service Level Agreements (SLAs)
1.2 Install Required Tools
# Install Azure CLI
curl -sL https://aka.ms/InstallAzureCLIDeb | sudo bash

# Install kubectl
az aks install-cli

# Install Helm
curl https://raw.githubusercontent.com/helm/helm/master/scripts/get-helm-3 | bash

# Verify installations
az --version
kubectl version --client
helm version
1.3 Azure Setup
# Login to Azure
az login

# Set subscription
az account set --subscription "your-subscription-id"

# Create resource group
az group create \
  --name rg-multitenant-aks \
  --location eastus

# Register required providers
az provider register --namespace Microsoft.ContainerService
az provider register --namespace Microsoft.OperationsManagement
Phase 2: AKS Cluster Deployment
2.1 Create AKS Cluster with Best Practices
# Define variables
RESOURCE_GROUP="rg-multitenant-aks"
CLUSTER_NAME="aks-multitenant-prod"
LOCATION="eastus"
NODE_COUNT=3
VM_SIZE="Standard_D4s_v3"
KUBERNETES_VERSION="1.28.3"

# Create AKS cluster with essential features
az aks create \
  --resource-group $RESOURCE_GROUP \
  --name $CLUSTER_NAME \
  --location $LOCATION \
  --node-count $NODE_COUNT \
  --node-vm-size $VM_SIZE \
  --kubernetes-version $KUBERNETES_VERSION \
  --enable-managed-identity \
  --enable-addons monitoring \
  --network-plugin azure \
  --network-policy azure \
  --enable-aad \
  --enable-azure-rbac \
  --enable-cluster-autoscaler \
  --min-count 3 \
  --max-count 10 \
  --vm-set-type VirtualMachineScaleSets \
  --load-balancer-sku standard \
  --uptime-sla \
  --generate-ssh-keys
Why These Settings?
- Managed Identity: Eliminates need for service principals
- Azure CNI: Advanced networking with network policies
- AAD Integration: Centralized identity management
- Cluster Autoscaler: Automatically scale nodes based on demand
- Uptime SLA: 99.95% availability guarantee
2.2 Get Cluster Credentials
# Get AKS credentials
az aks get-credentials \
  --resource-group $RESOURCE_GROUP \
  --name $CLUSTER_NAME \
  --admin

# Verify connection
kubectl get nodes
kubectl cluster-info
Phase 3: Tenant Namespace Design
3.1 Create Namespace Template
Create a file namespace-template.yaml:
apiVersion: v1
kind: Namespace
metadata:
  name:
  labels:
    tenant:
    environment: production
    cost-center:
    team:
  annotations:
    description: "Namespace for  application"
---
apiVersion: v1
kind: ResourceQuota
metadata:
  name: -quota
  namespace:
spec:
  hard:
    requests.cpu: "4"
    requests.memory: 8Gi
    limits.cpu: "8"
    limits.memory: 16Gi
    persistentvolumeclaims: "10"
    pods: "50"
    services: "10"
    secrets: "20"
    configmaps: "20"
---
apiVersion: v1
kind: LimitRange
metadata:
  name: -limits
  namespace:
spec:
  limits:
  - max:
      cpu: "2"
      memory: 4Gi
    min:
      cpu: 100m
      memory: 128Mi
    default:
      cpu: 500m
      memory: 512Mi
    defaultRequest:
      cpu: 250m
      memory: 256Mi
    type: Container
3.2 Create Tenants
# Function to create tenant namespace
create_tenant() {
  TENANT=$1
  COST_CENTER=$2
  TEAM=$3

  cat namespace-template.yaml | \
    sed "s//$TENANT/g" | \
    sed "s//$COST_CENTER/g" | \
    sed "s//$TEAM/g" | \
    kubectl apply -f -
}

# Create multiple tenants
create_tenant "tenant-alpha" "CC-1001" "team-alpha"
create_tenant "tenant-beta" "CC-1002" "team-beta"
create_tenant "tenant-gamma" "CC-1003" "team-gamma"

# Verify namespaces
kubectl get namespaces --show-labels
kubectl describe resourcequota -n tenant-alpha
Phase 4: Network Isolation with Network Policies
4.1 Default Deny All Traffic
Create default-deny.yaml:
apiVersion: networking.k8s.io/v1
kind: NetworkPolicy
metadata:
  name: default-deny-all
  namespace:
spec:
  podSelector: {}
  policyTypes:
  - Ingress
  - Egress
4.2 Allow Specific Traffic
Create allow-ingress.yaml:
apiVersion: networking.k8s.io/v1
kind: NetworkPolicy
metadata:
  name: allow-ingress-from-ingress-controller
  namespace:
spec:
  podSelector:
    matchLabels:
      app: web
  policyTypes:
  - Ingress
  ingress:
  - from:
    - namespaceSelector:
        matchLabels:
          name: ingress-nginx
    ports:
    - protocol: TCP
      port: 80
    - protocol: TCP
      port: 443
---
apiVersion: networking.k8s.io/v1
kind: NetworkPolicy
metadata:
  name: allow-dns
  namespace:
spec:
  podSelector: {}
  policyTypes:
  - Egress
  egress:
  - to:
    - namespaceSelector:
        matchLabels:
          name: kube-system
    ports:
    - protocol: UDP
      port: 53
4.3 Apply Network Policies
# Apply to each tenant namespace
for TENANT in tenant-alpha tenant-beta tenant-gamma; do
  cat default-deny.yaml | sed "s//$TENANT/g" | kubectl apply -f -
  cat allow-ingress.yaml | sed "s//$TENANT/g" | kubectl apply -f -
done

# Verify network policies
kubectl get networkpolicies -A
Phase 5: RBAC Configuration
5.1 Create Tenant-Specific Roles
Create tenant-role.yaml:
apiVersion: rbac.authorization.k8s.io/v1
kind: Role
metadata:
  name: tenant-developer
  namespace:
rules:
- apiGroups: ["", "apps", "batch"]
  resources: ["pods", "deployments", "services", "configmaps", "secrets", "jobs", "cronjobs"]
  verbs: ["get", "list", "watch", "create", "update", "patch", "delete"]
- apiGroups: [""]
  resources: ["pods/log", "pods/exec"]
  verbs: ["get", "list", "create"]
---
apiVersion: rbac.authorization.k8s.io/v1
kind: RoleBinding
metadata:
  name: tenant-developer-binding
  namespace:
roleRef:
  apiGroup: rbac.authorization.k8s.io
  kind: Role
  name: tenant-developer
subjects:
- kind: Group
  name: ""
  apiGroup: rbac.authorization.k8s.io
5.2 Create Cluster-Level Admin Roles
Create cluster-admin-roles.yaml:
apiVersion: rbac.authorization.k8s.io/v1
kind: ClusterRole
metadata:
  name: namespace-admin
rules:
- apiGroups: [""]
  resources: ["namespaces"]
  verbs: ["get", "list", "watch", "create", "delete"]
- apiGroups: ["rbac.authorization.k8s.io"]
  resources: ["roles", "rolebindings"]
  verbs: ["*"]
---
apiVersion: rbac.authorization.k8s.io/v1
kind: ClusterRoleBinding
metadata:
  name: platform-admins
roleRef:
  apiGroup: rbac.authorization.k8s.io
  kind: ClusterRole
  name: namespace-admin
subjects:
- kind: Group
  name: "platform-admin-group-id"
  apiGroup: rbac.authorization.k8s.io
5.3 Apply RBAC
# Apply tenant roles
for TENANT in tenant-alpha tenant-beta tenant-gamma; do
  cat tenant-role.yaml | \
    sed "s//$TENANT/g" | \
    sed "s//your-aad-group-id/g" | \
    kubectl apply -f -
done

# Apply cluster roles
kubectl apply -f cluster-admin-roles.yaml

# Verify RBAC
kubectl get roles -A
kubectl get rolebindings -A
Phase 6: Ingress Controller Setup
6.1 Install NGINX Ingress Controller
# Create ingress namespace
kubectl create namespace ingress-nginx

# Add Helm repo
helm repo add ingress-nginx https://kubernetes.github.io/ingress-nginx
helm repo update

# Install NGINX Ingress
helm install ingress-nginx ingress-nginx/ingress-nginx \
  --namespace ingress-nginx \
  --set controller.replicaCount=2 \
  --set controller.nodeSelector."kubernetes\.io/os"=linux \
  --set controller.service.loadBalancerIP="your-static-ip" \
  --set controller.service.annotations."service\.beta\.kubernetes\.io/azure-load-balancer-health-probe-request-path"=/healthz \
  --set controller.metrics.enabled=true \
  --set controller.podAnnotations."prometheus\.io/scrape"=true \
  --set controller.podAnnotations."prometheus\.io/port"=10254

# Get external IP
kubectl get service -n ingress-nginx ingress-nginx-controller
6.2 Configure Tenant Ingress
Create tenant-ingress.yaml:
apiVersion: networking.k8s.io/v1
kind: Ingress
metadata:
  name: -ingress
  namespace:
  annotations:
    nginx.ingress.kubernetes.io/rewrite-target: /
    nginx.ingress.kubernetes.io/ssl-redirect: "true"
    cert-manager.io/cluster-issuer: letsencrypt-prod
spec:
  ingressClassName: nginx
  tls:
  - hosts:
    - .yourdomain.com
    secretName: -tls
  rules:
  - host: .yourdomain.com
    http:
      paths:
      - path: /
        pathType: Prefix
        backend:
          service:
            name: -service
            port:
              number: 80
Phase 7: Azure Integration
7.1 Integrate Azure Key Vault
# Enable Azure Key Vault Provider for Secrets Store CSI Driver
az aks enable-addons \
  --addons azure-keyvault-secrets-provider \
  --name $CLUSTER_NAME \
  --resource-group $RESOURCE_GROUP

# Create Key Vault
az keyvault create \
  --name kv-multitenant-aks \
  --resource-group $RESOURCE_GROUP \
  --location $LOCATION

# Grant AKS access to Key Vault
AKS_IDENTITY=$(az aks show -g $RESOURCE_GROUP -n $CLUSTER_NAME --query identityProfile.kubeletidentity.clientId -o tsv)

az keyvault set-policy \
  --name kv-multitenant-aks \
  --object-id $AKS_IDENTITY \
  --secret-permissions get list
Create secretproviderclass.yaml:
apiVersion: secrets-store.csi.x-k8s.io/v1
kind: SecretProviderClass
metadata:
  name: azure-keyvault-
  namespace:
spec:
  provider: azure
  parameters:
    usePodIdentity: "false"
    useVMManagedIdentity: "true"
    userAssignedIdentityID: ""
    keyvaultName: kv-multitenant-aks
    objects: |
      array:
        - |
          objectName: -db-password
          objectType: secret
          objectVersion: ""
    tenantId: "your-tenant-id"
7.2 Configure Azure Monitor
# Enable Container Insights
az aks enable-addons \
  --addons monitoring \
  --name $CLUSTER_NAME \
  --resource-group $RESOURCE_GROUP \
  --workspace-resource-id "/subscriptions/your-sub-id/resourceGroups/your-rg/providers/Microsoft.OperationalInsights/workspaces/your-workspace"
Phase 8: Observability Setup
8.1 Deploy Prometheus
# Add Prometheus Helm repo
helm repo add prometheus-community https://prometheus-community.github.io/helm-charts
helm repo update

# Install Prometheus
helm install prometheus prometheus-community/kube-prometheus-stack \
  --namespace monitoring \
  --create-namespace \
  --set prometheus.prometheusSpec.retention=7d \
  --set prometheus.prometheusSpec.storageSpec.volumeClaimTemplate.spec.resources.requests.storage=50Gi
8.2 Deploy Grafana Dashboards
# Grafana is installed with Prometheus stack
# Get Grafana password
kubectl get secret -n monitoring prometheus-grafana -o jsonpath="{.data.admin-password}" | base64 --decode

# Port-forward to access Grafana
kubectl port-forward -n monitoring svc/prometheus-grafana 3000:80
Phase 9: Cost Management
9.1 Enable Cost Analysis
Create kubecost.yaml:
helm repo add kubecost https://kubecost.github.io/cost-analyzer/
helm install kubecost kubecost/cost-analyzer \
  --namespace kubecost \
  --create-namespace \
  --set kubecostToken="your-token" \
  --set prometheus.server.global.external_labels.cluster_id=$CLUSTER_NAME
9.2 Implement Chargeback
# Label resources for cost allocation
kubectl label namespace tenant-alpha cost-center=CC-1001
kubectl label namespace tenant-beta cost-center=CC-1002
kubectl label namespace tenant-gamma cost-center=CC-1003

# Query costs by namespace
kubectl cost namespace --show-all-resources
Phase 10: Security Hardening
10.1 Pod Security Standards
Create pod-security-policy.yaml:
apiVersion: policy/v1beta1
kind: PodSecurityPolicy
metadata:
  name: restricted
spec:
  privileged: false
  allowPrivilegeEscalation: false
  requiredDropCapabilities:
    - ALL
  volumes:
    - 'configMap'
    - 'emptyDir'
    - 'projected'
    - 'secret'
    - 'downwardAPI'
    - 'persistentVolumeClaim'
  hostNetwork: false
  hostIPC: false
  hostPID: false
  runAsUser:
    rule: 'MustRunAsNonRoot'
  seLinux:
    rule: 'RunAsAny'
  fsGroup:
    rule: 'RunAsAny'
  readOnlyRootFilesystem: true
10.2 Enable Azure Policy for AKS
az aks enable-addons \
  --addons azure-policy \
  --name $CLUSTER_NAME \
  --resource-group $RESOURCE_GROUP
📊 Cost Comparison
Before Multi-Tenancy (10 Applications)
| Component | Count | Cost/Month | Total |
|---|---|---|---|
| AKS Cluster | 10 | $300 | $3,000 |
| Load Balancer | 10 | $50 | $500 |
| Public IPs | 10 | $5 | $50 |
| Monthly Total | $3,550 |
After Multi-Tenancy (10 Applications)
| Component | Count | Cost/Month | Total |
|---|---|---|---|
| AKS Cluster | 1 | $400 | $400 |
| Load Balancer | 1 | $50 | $50 |
| Public IP | 1 | $5 | $5 |
| Monthly Total | $455 |
Annual Savings: $37,140 (87% cost reduction)
🎯 Key Isolation Dimensions
1. Compute Isolation
- ResourceQuotas limit CPU/Memory per tenant
- LimitRanges enforce min/max per container
- Priority Classes for workload prioritization
2. Network Isolation
- Network Policies block cross-tenant traffic
- Separate subnets for sensitive workloads
- Private endpoints for Azure services
3. Data Isolation
- Separate PersistentVolumes per tenant
- Encrypted secrets with Key Vault integration
- Backup policies per tenant
4. Security Isolation
- RBAC restricts access to namespace resources
- Pod Security Standards prevent privilege escalation
- Service Mesh for mTLS between services
5. Operational Isolation
- Separate dashboards per tenant in Grafana
- Namespace-level alerts in Azure Monitor
- Cost allocation and chargeback per tenant
🚀 Best Practices
1. Namespace Naming Convention
<tenant-name>-<environment>-<region>
Example: alpha-prod-eastus, beta-dev-westeu
2. Resource Quotas Strategy
Small Tenant: 2 CPU, 4GB RAM
Medium Tenant: 8 CPU, 16GB RAM
Large Tenant: 32 CPU, 64GB RAM
3. Auto-Scaling Configuration
# Enable cluster autoscaler
az aks update \
  --resource-group $RESOURCE_GROUP \
  --name $CLUSTER_NAME \
  --enable-cluster-autoscaler \
  --min-count 3 \
  --max-count 20

# Configure HPA per tenant
kubectl autoscale deployment <app> \
  --namespace <tenant> \
  --cpu-percent=70 \
  --min=2 --max=10
4. Backup and Disaster Recovery
# Install Velero for backup
helm install velero vmware-tanzu/velero \
  --namespace velero \
  --set-file credentials.secretContents.cloud=./credentials-azure

# Backup specific namespace
velero backup create tenant-alpha-backup --include-namespaces tenant-alpha
🔍 Monitoring and Troubleshooting
Check Tenant Resource Usage
# CPU and Memory usage
kubectl top pods -n tenant-alpha
kubectl top nodes

# Check quota usage
kubectl describe quota -n tenant-alpha

# View resource requests/limits
kubectl describe nodes | grep -A 5 "Allocated resources"
Common Issues and Solutions
| Issue | Symptom | Solution |
|---|---|---|
| Pod eviction | Pods randomly terminated | Increase memory limits/quotas |
| Network timeout | Pods can’t communicate | Check NetworkPolicies |
| OOM kills | Containers crash | Set appropriate memory limits |
| Slow ingress | High latency | Scale ingress controller replicas |
| Cost overrun | Budget exceeded | Review resource quotas |
📈 Scaling Guidelines
When to Scale Nodes
# If CPU usage > 80% consistently
kubectl top nodes

# If memory usage > 85%
kubectl describe nodes | grep -i memory

# If pending pods exist
kubectl get pods --all-namespaces --field-selector=status.phase=Pending
When to Add New Clusters
Consider separate clusters when:
- Compliance requirements mandate physical isolation
- Geographic distribution needs regional clusters
- Scale exceeds 5,000 nodes or 150,000 pods
- Blast radius concerns for mission-critical workloads
🛡️ Security Checklist
- Enable Azure AD integration
- Configure RBAC for all tenants
- Apply Network Policies
- Enable Pod Security Standards
- Integrate Azure Key Vault
- Enable Azure Policy for Kubernetes
- Configure private cluster (optional)
- Enable Azure Firewall (optional)
- Implement vulnerability scanning
- Enable audit logging
- Configure backup and restore
- Test disaster recovery procedures
📚 Additional Resources
Official Documentation
CloudA2Z YouTube Tutorials
Tools and Utilities
💡 Real-World Use Cases
1. SaaS Application Platform
Company: Software Vendor serving 500+ customers
- Each customer gets isolated namespace
- Shared infrastructure reduces costs by 75%
- Auto-scaling handles traffic spikes
2. Enterprise Development Teams
Company: Large enterprise with 50+ dev teams
- Each team gets dedicated namespace
- Centralized governance and compliance
- Self-service portal for team provisioning
3. E-Commerce Multi-Brand
Company: Retail conglomerate with 20 brands
- Each brand runs in separate namespace
- Shared monitoring and logging
- Independent release cycles per brand
🎓 Next Steps
- Start Small: Begin with 2-3 tenants
- Automate: Use Terraform/ARM templates for cluster creation
- Monitor: Set up comprehensive observability
- Optimize: Review and adjust quotas monthly
- Scale: Add more tenants as confidence grows
- Document: Maintain runbooks for common operations
📞 Get Help
- Questions? Comment on the YouTube video
- Issues? Check the troubleshooting section above
- Consulting? Connect on LinkedIn
Author: Girish Kalamati, Sr. Cloud Solution Architect
Experience: Saved $220K annually implementing this at Uniper Energy
Last Updated: January 2026